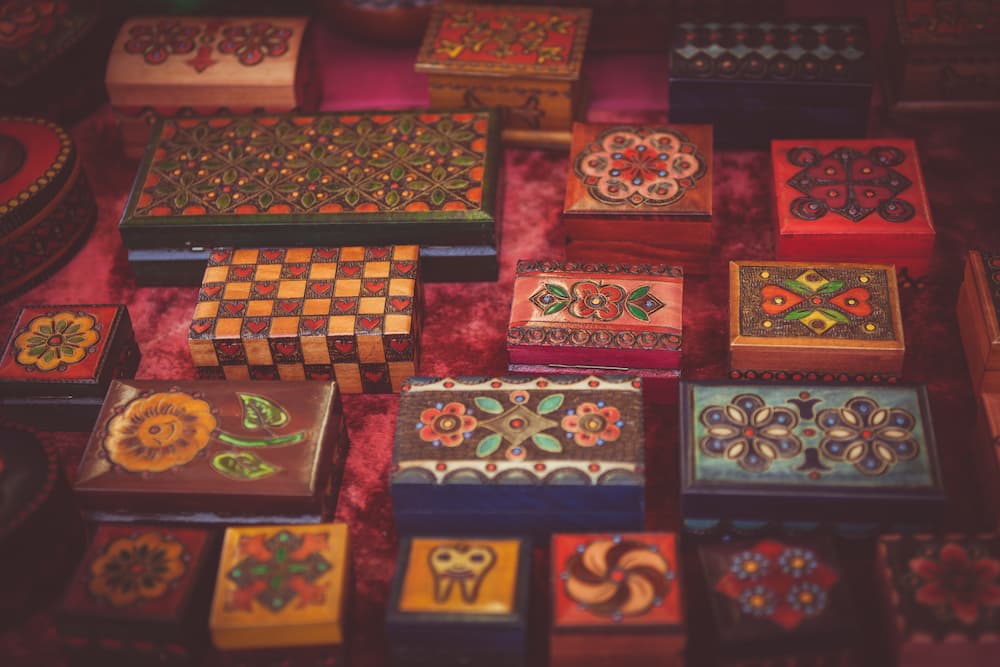
a morning with beck is my fave

June 5, 2013

This post is sponsored by Disney Story. To find out more about this brand-new story-creation app – and how it puts the power of storytelling in your hands - click here.

Being a really great storyteller is definitely a talent. A talent that I don’t so much have. One too many of my stories end with the sentence, “I guess you had to be there.” And when a young child asks me to make up a bedtime story, it’s a train wreck. So mostly for my children’s sake, I’m grateful for photography and talented friends who capture Beck’s big personality perfectly.

family photo session by Nicole Coleman

family photo session by Nicole Coleman

family photo session by nicole coleman

family photo session by Nicole Coleman

family photo session by Nicole Coleman

family photo session by Nicole Coleman

family photo session by Nicole Coleman

family photo session by Nicole Coleman

family photo session by Nicole Coleman

Shortly after Beck turned one Nicole Coleman, a recent Denver transplant and talented film photographer, came to our home for a casual photo session and I couldn’t love the results more. One of my nephews calls Beck Becky Man in a sing-songy voice, so when I look at these photos all I can think is, “Oh, Becky Man!”

You can see more from the shoot right here on Nicole’s blog, Petit Soul.

And since our families don’t live close and rarely get to see Beck, I tried the new app Disney Story to put together an easy to create and share digital story of some of my favorite photos from the morning.

Download the Disney Story app from iTunes  – for FREE – right here!
Disney Story Twitter
Disney Story Facebook

a lemon tart with candied lemons is my fave

May 31, 2013

Good news readers! Rebecca of First Mate Photo has agreed to join us monthly to share her baking skills. This lemon tart would be perfect for summer festivities.

YAMF-lemontart008

There is nothing more summery to me than a lemon tart. They’re so bright and cheery. While this isn’t the quickest dessert to throw together in a snap, it IS really beautiful and will impress your guests. It’s fairly simple to make, it just involves lots of chilling. Make sure to leave plenty of time for chilling the dough and cooling the crust.

YAMF-lemontart002

Gather your tools gals! Here’s what you’ll need:
- tart pan with removable bottom
- pie weights (or dry beans or rice)
- parchment paper
- sieve

YAMF-lemontart005

Crust
- 2 1/2 cups flour
- 1/4 cup sugar
- 1/4 teaspoon salt
- 1 cup butter
- 2 large egg yolks beaten
- 2-4 tablespoons of cream or cold water

Put your FLOUR, SUGAR, and SALT in a food processor until it’s combined (or if your food processor is tiny like mine, a large bowl, then mix with a fork.) Add butter and pulse until it makes a coarse meal. Add the yolks and 2 tablespoons of your cream or water, mix just until the dough comes together. Add the remaining cream if the dough is too dry. Divide your dough in half and wrap up in plastic. Put it in the fridge for 1 hour. Dough accomplished! Easy right?

Preheat oven to 375. Once your dough is chilled roll it to a thickness of 1/8 inch on a floured surface. Press it into a 9 inch tart pan and up the sides. Pierce the bottom with a fork and trip the edges. Refrigerate or freeze until it’s firm, about 30 minutes. Line your pie shell with parchment and fill it with your pie weights of beans. Bake until the edges just barely turn golden, 15 minutes. Then remove the weights and paper and finish baking, about 10 minutes more. Let it cool completely.

YAMF-lemontart010

Lemon filling (lemon curd)
- 6 large egg yolks
- 1 tablespoon lemon zest
- 1/2 cup lemon juice (this will probably use 2-3 lemons)
- 3/4 cup sugar
- pinch of salt
- 1/2 cup cold butter, cut into small pieces

In a saucepan whisk together the YOLKS, ZEST, JUICE, SUGAR, and SALT. Bring to a simmer on medium heat, whisking constantly. Cook this until it’s thickened, which should take about 8-10 minutes. And by thick I mean it should be almost the consistency of pudding. Once that’s thick strain it through a fine mesh sieve into a bowl. Immediately whisk in your pieces of BUTTER, one at a time. It’s important to wait until each piece is melted or you’ll cool your curd down too fast and the rest won’t melt. Press some plastic wrap directly onto the surface of the curd and refrigerate for at least an hour. (more is preferable)

YAMF-lemontart011

Candied lemon slices
- 1 lemon (or citrus of choice)
- 3/4 cup sugar
- 3/4 cup water

I would make these the day before or first thing before you make the rest of the tart, since they take a little while to cool and dry.

You can candy any citrus you like to put on the top, this method will work with lemons, oranges, limes, and grapefruit. Some pink grapefruit and limes would look especially beautiful on top!

Stir together sugar and water in a saucepan on medium heat, until water comes to a boil and sugar dissolves. Reduce heat to low; add lemon slices. Cover with a circle of parchment paper (this keeps the lemons submerged. Gently simmer until translucent and lemons are candied about 30 minutes. Remove pan from heat to cool, but keep lemons in the syrup. When the lemons are cool remove them from the pan and let them dry on a wire rack.

When everything is FINALLY cool, and you’re kids have grown, spread the lemon tart in the shell and arrange your lemon slices however you like on top.

YAMF-lemontart009

If candying fruit isn’t your thing, good news, lemon tarts are a very versatile dessert! They look and taste just as lovely with almost any other kind of fresh fruit on top. Raspberries are one of my favorites.

See more from Rebecca at First Mate Photo and her Etsy shop!

a color block necklace is my fave

May 30, 2013

color block necklace

Since I haven’t dabbled in jewelry making since Girl Scouts and friendship bracelets, I decided I better keep it simple when presented with a box of supplies from the new Martha Stewart Crafts Jewelry line. So today I present the three-step color block necklace (for the beginner set).

color block necklace

Supplies:
- Martha Stewart Crafts silver setting
- 2 colors of paint (I used acrylic but would suggest jewelry gloss or enamel for more permanent results)
- paint brush
- necklace chain
- jump ring
- clasp

color block necklace

Step one: Flip the setting to the back side and paint top half with one of your paint colors. Let dry. Then paint the bottom half with the other color. You can go light or heavy with the paint. I let a little silver peek through.

Step two: Open up jump ring with pliers and attach to the setting.

Step three: Cut chain to length and attach clasp. String through the jump ring and it’s ready to wear.

color block necklace

This project is part of 12 Months of Martha, one craft a month using products from the Martha Stewart Craft line. See more jewelry projects using the new Martha Stewart Crafts Jewelry line right here.

an ice cream crawl is my fave

May 29, 2013

Kersey and crew were visiting Denver last weekend and since I base my vacations around food, I decided an ice cream crawl was in order. Here are the places we went in Denver (but you could easily do this in any city):

bonnie brae ice cream

bonnie brae ice cream

Bonnie Brae – Old fashioned ice cream at it’s finest. The itty bitty cone is all I could muster since this was our last stop.

little man ice cream

Little Man – The salted oreo won our pick for best flavor. Plus it’s impossible not to like something that’s served to you through the windows of a giant milk jug.

cloud 9 frozen custard

Cloud 9 Frozen Custard – Ryan would say this easily wins best frozen treat in Denver. Just chocolate and vanilla, but what mighty chocolate and vanilla it is. Plus the owners know everybody by name.

sweet action ice cream

sweet action ice cream

Sweet Action – This is where the cool kids go. I pose for a minute to grab some cookie butter oreo or salted butterscotch.

buenos aires gelato

Buenos Aires Pizzeria gelato – Super flavorful as gelato should be.

All you need to do to turn this into a party is arm each guest with a map highlighting each stop and in which order, and carpool (or bike) around for your city’s best frozen treats. You could even have a score card like we did for the chocolate chip cookie party. Add it to your summer bucket list.

a tee for dad is my fave

May 28, 2013

Today’s post is from sweet Joy, the gal behind Frock Files. I’m familiar with the freezer paper technique of transferring an image on a shirt but I’m happy to learn about this new screen printing method. What’s even better is you can customize it any way you like.

handmade father's day present

Whenever my dad is at the Asian market, the old ladies come over to tell him that he looks just like a Japanese soap opera star. He’s also in a rock band with his high school buddies. My nephew thinks this is all very goofy and embarrassing. Whenever he hears my dad sing he covers his ears, and we like to say, “But Akira, grandpa is a stud!” This only makes him giggle harder.

Since my family lives in Hawaii, t-shirts are easy to wear all year, so I thought I’d make one emblazoned with the word “STUD” as a joke for my dad this Father’s Day. I learned this screen printing technique in high school and, though it’s not perfect, it’s definitely a fun way to make a customized t-shirt with a few supplies you probably already have on hand.

handmade father's day present

Supplies:

Small, cheap brushes (narrow and wide)
Mod Podge
Embroidery hoop
T-shirt
Fabric paint
Printed design
Sheer fabric (like a sheer curtain panel)

handmade father's day present

1. Print out an image that you like. It’s easiest to go with something that has a somewhat organic shape, since it will be more forgiving. (Typography is hard to get right!)

handmade father's day present

2. Cut a piece of sheer fabric to fit in the embroidery hoop. Place the fabric within the embroidery hoop and tighten. Pull the fabric as taut as possible.

3. Place the embroidery hoop with the fabric on top of the design. The edges of the fabric will be facing up toward you, like a cupcake liner. Trace the design using a pencil.

4. Using a narrow paintbrush, trace around the design with Mod Podge. You’ll want to cover all the areas that won’t get painted. Allow the Mod Podge to dry completely then apply one more coat.

handmade father's day present

5. Place a few sheets of paper between the two layers of the t-shirt. Using a wide brush, paint over the design with your fabric paint. You may want to use a light stippling motion to make sure the paint seeps all the way through the fabric. Apply another coat while the first is still wet.

6. Remove the embroidery hoop to reveal your design.

handmade father's day present

My dad is probably going to be really embarrassed that I’ve let you all in on this family joke. So what nicknames do you have for your dad?

See more from Joy on Frock Files

jet set paper dolls are my fave

May 24, 2013

jet set paper dolls from bunny pumpkin

jet set paper dolls from bunny pumpkin

jet set paper dolls from bunny pumpkin

jet set paper dolls from bunny pumpkin

My friend’s daughter was over yesterday and was playing with the most stylish paper dolls that it made me want to sit down and play too. I wasn’t surprised to learn that the sets were designed by Denise Hedin but I was surprised to learn that they’re available for download for only $5. The detailed accessories are my favorite part. I mean, what doll doesn’t need her own personal fondue pot?

You can purchase each set from Bunny Pumpkin. Perfect for rainy day play.

Some other posts from the week that you’re sure to like:
- The best summer party ideas
- Pretty drink dispensers for outdoor dining
- Make your plain tablecloths a whole lot cooler
- Best of the week!

spotted and hearted (the reprise)

May 23, 2013

Remember how I used to do spotted and hearted every week and then it just stopped? It was from a combination of things. I wanted to change the format, I wanted to change the name, I didn’t browse online as much, yada yada yada. But today, and maybe just for today, I decided it needed a reprise.

handmade pinata

I’ve been thinking about this pinata too long not to buy it

vintage art print

And I think I need this print to match

linen tablecloths

Herringbone, linen tablecloths in the prettiest colors and half off

parcheesi

I’ve actually never played Parcheesi but I think the board is pretty enough to frame

strawberries

All of Amy Walter’s summer fruit patterns are delightful

I hope this reprise wasn’t hated like Can You Feel the Love Tonight.

the art of small gatherings is my fave

May 22, 2013

The Set Table by Hannah Shuckburgh

The Set Table by Hannah Shuckburgh

The Set Table by Hannah Shuckburgh

The Set Table by Hannah Shuckburgh

While I tend to feature larger parties on yamf, I’m much more a fan of small gatherings for several reasons. One being that I dislike when too many conversations are going on at once and I can’t seem to insert myself in any of them. Two, I’m really bad at estimating how much food to make. And three, our table can only seat six people. So I’ve made it a goal to invite smaller groups over for casual dinners monthly. The newly released title, The Set Table: the Art of Small Gatherings by Heather Shuckburgh, is inspiring me to be thoughtful in planning each one and include special touches like colorful napkins, a mix of patterned plates, or a silver cup of flowers. Maybe pretty details will distract from the fact that I’m no Julia Child.

The Set Table: the Art of Small Gatherings is by Heather Shuckburgh, published by Cicada Books, and available for purchase on Amazon. All photos by Charlotte Bland. Via Chelsea Fuss.

party mini buttons are my fave

May 17, 2013

mini party buttons

mini party buttons

One time we were at a party and Ryan successfully convinced everybody that my favorite band is Smash Mouth. That embarrassing occasion inspired these mini button name tags that are meant to not only be an accessory for your guests, but a conversation starter. You can see all the details right here on Julep. I think my favorite one might be Truman: banned from Chilis for life. Thanks to Kirsten for designing these!

Some other posts from the week you’re sure to like:
- Leif has the prettiest items for your tabletop
- I need a new phone cover – diy it or buy something rad?
- It’s about that time to do another homemade pinata round-up
- 7 of my fave online sites to buy affordable art
- Do you know what faux-dermy is?
- Best of the week!

an image transfer card is my fave

May 15, 2013

Today’s tutorial was created by the talented Alana of Humunuku. Why didn’t I know image transfer was so easy? I can’t wait to try this on muslin bags for party favors.

easy image transfer tutorial

Once I discovered how simple image transfer is, I wanted to customize every item in reach. This technique can be used in so many different ways. Think gift tags, invitations, party favors or even and art project for a rainy day. Try it, you’ll be hooked.

easy image transfer tutorial

To make your own image transfer you’ll need:
- Photo Copy or Printed Image (printed with toner not ink jet ink)
- Something to print on. A card, paper, ribbon, tags, etc.
- Design Art Marker (Preferably the clear blending color or a light grey)

easy image transfer tutorial

1. Make a photo copy of an image you’d like to transfer. If you are using something with words, you will want to reverse the image. A contrasty image seems to work best and is most clear.

2. With toner side down, place the image on the surface you’d like to transfer the image to.

easy image transfer tutorial

3. Using the designer art marker, ink up the entire back of the image, pressing down firmly. Sometimes I go over the important parts a few times to get it very saturated.

easy image transfer tutorial

Remove the copy and it’s done. Easy!

easy image transfer tutorial

easy image transfer tutorial

See more from Alana on her blog or shop (elephant pouches!)


A Darling Site